Friday, June 29, 2012

Moving Day!

Well, moving day(s) went off really well.  We had a ton of help from family and friends which made it go by super fast.  Thanks to everybody for all your help!  We couldn't have done it without you!  

My niece, Maggie, wearing one of my wall decorations...

 Daniel with my niece, brother, and sister-in-law posing in front of all 4 truck loads of stuff we took on our 1st trip...

And the utter chaos that ensued...


We certainly have our work cut out for us getting all our junk stuff put away!  Now the real fun begins!  Wa-hoo!

Thursday, June 28, 2012

Parting is bittersweet...

We're saying goodbye to our little rental house... our first home together since we've been married and where we've spent the last 2 years.  We're happy to have a place of our own, but we will miss our little rental house on the hill!  We've made a lot of good memories there and had an awesome landlord who added a garage and back porch, paid for us to put in new cabinets and countertops in the kitchen, and that has given us free reign to do all kinds of things to his house.  Here's a little trip down memory lane: 


Just after we added the flower beds and walkway
Halloween
White Christmas
Summer
Back flower bed
Master bedroom
 Dining room

 Kitchen

 Living room

 Guest room
 Back porch
Patio/Fire pit

If anyone in our area is looking for a place to rent, this will be available in July of 2012.  We told our landlord we'd be on the lookout for a good renter to take our place.  Shoot me an email and I can give you the details.  It's a 2 bedroom/1 bath with a garage, storage building, and approximately 2 acres of land.  The landlord is awesome and the rent is super reasonable!
Goodbye, little house!

Wednesday, June 27, 2012

Closing Day!

Well, the day of closing finally arrived!  Here we are at closing on 6/18 with our realtor, Dorothy.


 After about 30 minutes of signing our lives away, we are officially homeowners!


$7.00 Patio

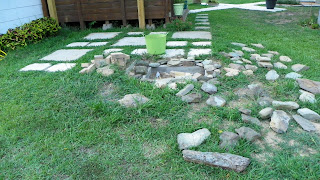
At our rental, there was an area beside the back deck that was the perfect size and shape for a patio. It was nothing but grass, and it just looked like it needed something. We wanted to put in a fire pit/patio area, but didn't want to do anything really expensive since it was just a rental. Luckily, we had an awesome landlord who pretty much let us do whatever we wanted to the property.  Here's what we came up with: use stepping stones and concrete pads to create a grid, integrate with grass, and add a stone fire pit.

Our inspiration:


Here's how we did it:  

We already had a bunch of stepping stones that were either given to us or lying around the property that we had pulled up or relocated.  Daniel was also able to score some free salvaged air conditioner platforms from a heating and air company.  We started by measuring each stepping stone/platform and making a scale drawing of each one on graph paper and cut them out.  We measured the area where we wanted to put the patio and drew that out on our graph paper.  Then, we just played around with the pieces till we had a design that we liked and that fit the space.  


Next came the heavy lifting.  We Daniel started by tilling up the area with his tiller to make the ground easy to manipulate so our base would be as level as possible.  Then, we smoothed it out with rakes and a long board that we would drag over the dirt till it was fairly level.  The area was already pretty flat, but you really have to get it perfect or your pavers will wobble and you'll stub your toe on them... not fun.  Once we had all that smoothed out, we started placing the pavers.  WARNING: THIS IS NOT FOR THE FAINT OF HEART!!  Getting all those things straight and level is a VERY HEAVY, annoying, back-breaking, sweat-inducing process.  We went through much arguing discussion over whether each piece was perfectly placed and spaced.  


Once all that was finished, we  Daniel dug the hole for the fire pit, installed a french drain with some leftover black piping he had (so it wouldn't fill up with rain water and become a mosquito breeding ground) and lined it with Quickcrete (which was our only purchase, on sale at Lowe's for $7.00).  


Then we just used rocks that we found on the property and laid them around the edge to build it up a little.  


After all this was done, we planted grass seed and some flowers and let nature do the rest.  It took A LOT of time and elbow grease, but for $7.00, I think it turned out pretty cute!  


The grass has finally filled in nice and thick...just in time for us to move!  The plan was to get some cute patio furniture and have a cool space to hang out and entertain.  Hopefully, the next renters will get some enjoyment out of all our hard work!  

Monday, June 11, 2012

Yard Art

Just wanted to post a little yard art project I did.  This little storage building is off the side of our house and you see the broad side of it as you drive up to our house.  It always looked like it needed something to liven it up a bit.  I simply took some old windows we had lying around, painted them each a different bright color, then had Daniel screw them together and hang them on the side of the building.  Pretty simple.  The windows were free, and I used sample wall paint from Lowe's Hardware (you can get samples of any color for $3 apiece... I bought red, yellow, and blue and mixed and matched to make my own custom colors).


(Please ignore all the untidy weeds growing in front... I usually have bright, colorful Zinnias growing here, but with all the new house preparations, I haven't really had much time for gardening.)
I started to hang the windows in a row, just like as if there were windows in the side of the building, but then I decided to screw them together to make more of a sculpture out of it.  It was Daniel's idea to turn it on its side like that.  I think it kinda looks like a windmill.  Colorful visual interest that was really easy, quick and cheap!  Just what I wanted!

Saturday, June 9, 2012

Fab-tastic new rug

I just made my first rug purchase for the new house!  My inspiration was from this post, which I found on Pinterest:

I love the lime green door (which I plan to copy in my new house) and I love that rug with all the summery colors.  While I loved the rug, I didn't love the price-tag so much.  So, thanks to Fab.com, a new website I've recently discovered, I found this rug:
It's designed  by Fab Habitat.  It's made from recycled polypropylene straws, so I feel like I'm being green. Since it's plastic, it's mold and mildew resistant and really easy to clean.  You just hose it off or wipe it down with a wet cloth if it gets dirty, which is perfect for a kitchen/laundry room.  And at $33 for a 4x6 rug, you can't beat the price!  They have all kinds of other indoor/outdoor rugs in cute designs.  I plan to cut it into 2 rugs so I can  have one in the kitchen, and one in the laundry.  Two rugs for the price of one... I like it!